
Beginning Ember.js on Rails: Part 1

This is part of a series of posts on Ember.js. Please read Warming up to Ember.js as well as the Ember.js home page if you're new to Ember.js.
Ember.js is not dependent upon any particular server stack. In fact, it can be used on its own to control single page web or mobile PhoneGap apps that don't have a backend at all. Check out the canonical Ember Todos app for a simple online example.
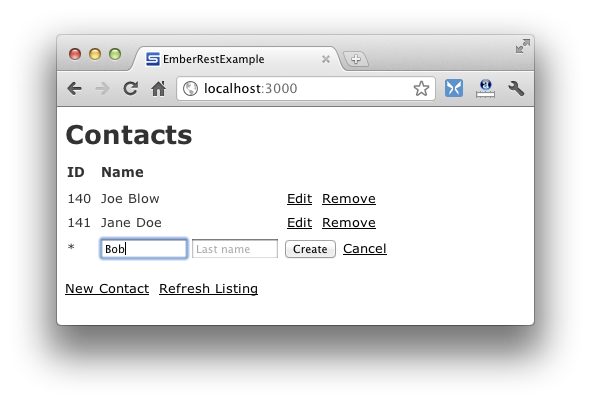
I've chosen to write a demonstration app that I wish I could have referenced when I started learning Ember. It's a simple Rails 3.1 app that demonstrates CRUD much like the standard Rails scaffolding. It has a front-end written entirely in Ember that communicates with its backing resources through their REST interfaces.
Just lovely, isn't it?
DIY Demo
Let's first get the example app running on your own system. This example will be used throughout this series, so you'll want to refer to it often.
Just pull it down from Github and fire it up in Ruby 1.9.2+:
1 2 3 4 5 |
git clone https://github.com/dgeb/ember_rest_example cd ember_rest_example bundle install bundle exec rake db:migrate rails s |
Point your browser to localhost:3000 to give this CRUD-dy app a try.
Dependencies
This example has just a few dependencies beyond the basic Rails 3.1 stack.
The straightforward ember-rails gem
pre-compiles handlebars templates in the asset pipeline. It also simplifies
including ember.js, but my preference is to build or
download a particular version
for stricter control.
For persistence, this example uses Ember REST, a very simple library that I created (and open sourced) for managing RESTful resources. I tried to keep this library as lean and understandable as possible. Other alternatives for persistence include Ember Data, which is in heavy development by the Ember team and "definitely alpha-quality" (in their words), and Ember Resource.
Architecture
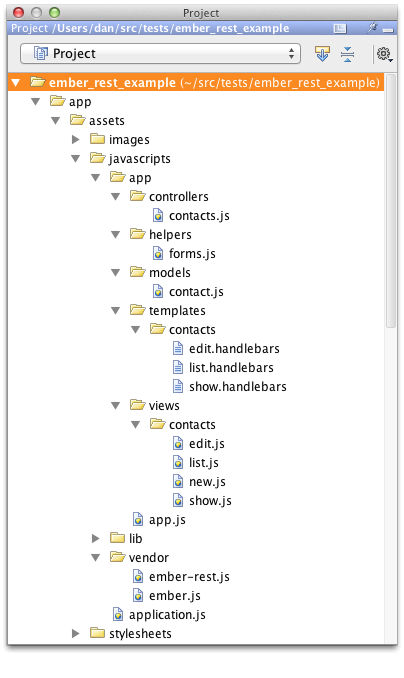
Ember does not require that your files be organized in a particular way.
However, I find it helpful to organize Ember applications with the following
structure within app/assets/javascripts:
app/- the container for all js and templates related to this Ember appapp/app.js- declaration of a globalAppobject that extendsEmber.Applicationapp/models/- model classes that represent resourcesapp/controllers/- controllers that manage resources and are bound to viewsapp/views/- view classes, organized in subfoldersapp/templates/- handlebars templates, organized in subfolders to match viewsapp/helpers/- handlebars helpersvendor/- vendored libraries likeember.jsandember-rest.jslib/- general customizations to Ember
Note that I'm including vendor and lib in the app/assets/javascripts
directory. This allows for a clear distinction between vendor/ember.js and
ember.js, which would come from the ember-rails gem. However, feel free to
follow the Rails convention of using vendor/assets/javascripts and
lib/assets/javascripts instead.
The ember_rest_example app follows this pattern:
Adding Ember to your own app
Let's now go through the steps of adding Ember to any new or existing Rails 3.1+
app. Start by modifying your Gemfile to include:
1 |
gem 'ember-rails' |
From your app's root:
1 |
bundle |
Next, duplicate the directory structure described above. From your app's root:
1 2 |
cd app/assets/javascripts mkdir app app/controllers app/helpers app/models app/templates app/views lib vendor |
Pull down the latest stable or development version of
ember.js and add it to your
app/assets/javascripts/vendor directory. I recommend this approach to ensure
complete control over your js.
Because the Asset Pipeline doesn't include dependency management concepts,
everything must be included in the proper order within the js file you include
on your pages. For instance, our example's application.js contains:
1 2 3 4 5 6 7 8 9 10 11 |
//= require jquery //= require jquery_ujs //= require ./vendor/ember //= require ./vendor/ember-rest //= require_tree ./lib //= require app/app //= require_tree ./app/models //= require_tree ./app/controllers //= require_tree ./app/views //= require_tree ./app/helpers //= require_tree ./app/templates |
You can use this as a starting point, but remove the ember-rest line if you're
using a different persistence library.
You're now ready to create a global Ember App object. It's not important that
this object be named App. You might prefer to use your app's name to
personalize this object and namespace your whole app. Either way, creating your
Ember app can be as simple as:
1 |
App = Ember.Application.create(); |
Hopefully that was easy. Your Rails app is now configured to work with Ember!
Please continue on to Beginning Ember.js on Rails: Part 2, which demonstrates querying a resource's REST interface to display a list of records in an Ember view.