
Understanding Ember.Object

Almost every object in Ember.js is derived from a common object: Ember.Object. This object is used as the basis for views, controllers, models, and even the application itself.
This simple architectural decision is responsible for much of the consistency across Ember. Because every object has been derived from the same core object, they all share some core capabilities. Every Ember object can observe the properties of other objects, bind their properties to the properties of other objects, specify and update computed properties, and much more.
As you'll see in this post, it's easy to get started with Ember.Object, but also easy to overlook some of its capabilities. A better understanding of Ember.Object will help you understand the architecture of Ember itself and enable you to improve the architecture of your own application.
Creating objects
It's almost as simple to create a new Ember.Object as a plain Javascript object:
1 2 3 4 5 6 7 |
var emberObject = Ember.Object.create({ greeting: "hello" }); var jsObject = { greeting: "hello" }; |
The object literal that is optionally passed to Ember.Object.create() defines
properties directly on the instantiated object, not unlike the vanilla object.
However, upon inspection in your console, you can see there's quite a bit more
going on behind the scenes of the Ember object:
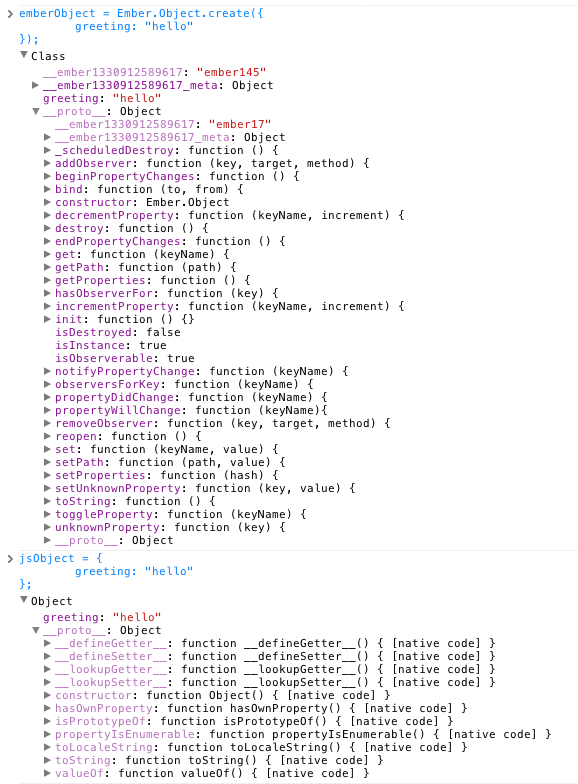
It would take a long tour of the Ember source to explore all the properties of
even such a simple Ember object. Needless to say, it's all required for Ember to
enable bindings, observers, and more. Although it looks like quite a bit of
overhead, the complexity of the Ember object is contained almost entirely in its
prototype (Ember.Object.prototype) and not within the object instance.
Extending classes
To go beyond vanilla Ember objects, you can extend Ember.Object or any of its
descendents to create your own classes:
1 2 3 4 5 6 7 8 9 10 11 |
var Person = Ember.Object.extend({ species: "homo sapiens" }); var Man = Person.extend({ gender: "male" }); var Woman = Person.extend({ gender: "female" }); |
Important: the object literal that is passed as an argument to extend()
defines properties for the *prototype** of objects that will be instantiated by
the class.*
Now, let's instantiate a person with create():
1 2 3 |
var joe = Man.create({ name: "Joe" }); |
Important: remember that the object literal passed to create() defines
properties of the *instantiated object** (not its prototype).*
And let's inspect our new person:
1 2 3 4 5 6 7 8 9 10 |
console.log( joe.get("name") ); // "Joe" console.log( joe.hasOwnProperty("name") ); // true console.log( joe.get("gender") ); // "male" console.log( joe.hasOwnProperty("gender") ); // false console.log( joe.get("species") ); // "homo sapiens" console.log( joe.hasOwnProperty("species") ); // false console.log( Man.prototype.isPrototypeOf(joe) ); // true console.log( Person.prototype.isPrototypeOf(joe) ); // true console.log( Ember.Object.prototype.isPrototypeOf(joe) ); // true |
As you can see, the prototype chain for joe includes Man.prototype,
Person.prototype, and Ember.Object.prototype. Our person can correctly
evaluate his name (defined directly on the instance), gender (defined on
Man.prototype), and species (defined on Person.prototype). What a smart guy!
Initialization (and a common mistake!)
One of the most common mistakes for beginners to Ember is to think they're passing properties to an instance instead of a prototype. For example:
1 2 3 4 5 6 7 8 9 10 11 12 13 |
var Person = Ember.Object.extend({ chromosomes: ["x"] // CAREFUL !!!!! }); var joe = Person.create(); joe.get("chromosomes").push("y"); var jane = Person.create(); jane.get("chromosomes").push("x"); // Joe and Jane are all mixed up?!?!?!?! console.log( joe.get("chromosomes") ); // x, y, x console.log( jane.get("chromosomes") ); // x, y, x |
Why did this chromosomal mutation happen? The problem started when we added an
array to our prototype when defining the Person class. This array was then
shared with each object instantiated from Person.
How should we have handled this?
1 2 3 4 5 6 7 8 9 10 11 12 13 14 15 16 17 |
var Person = Ember.Object.extend({ chromosomes: null, init: function() { this._super(); this.set("chromosomes", ["x"]); // everyone gets at least one X chromosome } }); var joe = Person.create(); joe.get("chromosomes").push("y"); // men also get a Y chromosome var jane = Person.create(); jane.get("chromosomes").push("x"); // women get another X chromosome // Hurray - everyone gets their own chromosomes! console.log( joe.get("chromosomes") ); // x, y console.log( jane.get("chromosomes") ); // x, x |
When declaring objects or arrays in your classes, you'll typically want to
initialize them along with each instance in the init() function. In this way,
each of your objects will receive its own unique instances of objects and
arrays. Also remember to call this._super() from within init() so that
init() will be called all the way up the prototype chain.
Of course, there's nothing wrong with keeping objects or arrays directly in your
prototypes if they are meant to remain constant across instances. In fact, one
common pattern is to keep a default setting in the prototype that's then
duplicated for each instance in init(). These kinds of patterns are easy to
implement once you realize how objects are created and initialized.
Want to play more with inheritance and initialization? I've extended this example on jsFiddle.
Reopening objects and classes
You can easily add properties to Ember classes after they've been defined using
reopen():
1 2 3 4 5 6 7 8 |
var Person = Ember.Object.extend({ firstName: null, lastName: null }); Person.reopen({ middleName: null }); |
Specifically, reopen() modifies the prototype that will be used for objects
instantiated by a class.
If you want to add properties directly to a class, use reopenClass():
1 2 3 4 5 6 7 8 9 10 11 12 |
var Person = Ember.Object.extend({ firstName: null, lastName: null }); Person.reopenClass({ makeBaby: function(attributes) { return Person.create(attributes); } }); var huey = Person.makeBaby({firstName: "Baby", lastName: "Huey"}); |
One useful pattern is to define class methods for finding and/or creating objects.
Mixing in concerns
While extending classes in a hierarchical fashion often works well, there is a
tendency to end up with classes such as MaleLeftHandedPetOwnersOfPoodles.
Trying to munge together a bunch of separate concerns in a single class can get
messy. Ember's answer to this problem is Ember.Mixin. Here it is in action:
1 2 3 4 5 6 7 8 9 10 11 12 13 14 15 16 17 18 19 20 21 22 23 24 25 26 27 28 29 30 31 32 33 34 35 36 |
var Pet = Em.Object.extend({ name: null }); var PetOwner = Ember.Mixin.create({ pet: null, init: function() { this._super(); this.set("pet", Pet.create({})); } }); var Male = Ember.Mixin.create({ chromosomes: null, init: function() { this._super(); this.set("chromosomes", ["x", "y"]); } }); var joe = Ember.Object.create(PetOwner, Male, { age: 25, name: "Joe", init: function() { this._super(); this.get("pet").set("name", "Fifi"); } }); console.log( joe.get("name") ); // Joe console.log( joe.get("age") ); // 25 console.log( joe.get("chromosomes") ); // x,y console.log( joe.get("pet.name") ); // Fifi |
In this example, we're merging a number of separate concerns in a single object.
Joe is both a PetOwner and a Male, and has other traits such as an age and
name. He not only has a pet, but that pet even has a name.
The separate concerns are each represented by an Ember.Mixin. The joe object
is created as a merger of the PetOwner and Male mixins, as well an object
literal that represents instance properties. Mixins get initialized in the order
in which they are passed to create(), which allows joe to set his pet's name
after PetOwner has created that pet.
Want to play more with this example? It's also on jsFiddle.
But wait... there's more :)
Mixins aren't limited to objects that you create(). They can also be used with
extend(), reopen(), and reopenClass.
Furthermore, there's a suite of useful mixins built right into Ember core. Do you want your object to be enumerable? Mix in Ember.Enumerable. Want to create a view that triggers an action? Extend it with Ember.TargetActionSupport.
I think you'll find that by separating lateral concerns in mixins, and
hierarchical concerns with extend(), you can build a very flexible
architecture for your Ember apps.
Any questions or suggestions for further Ember posts? Please feel free to comment below -- Dan